Ubuntu Server fails
Hello, I am very interested in trying this. I am trying ubuntu-20.04.1-live-server-arm64.iso and would like to perform a install. so I also created a DMG. But it does not seems to launch the installer ... do you have an idea what I am doing wrong ?
I use the following parameters ./vftool -k /Users/simonph/Desktop/Ubuntu/UbuntuServer/vmlinuz -i /Users/simonph/Desktop/Ubuntu/UbuntuServer/initrd -d /Users/simonph/Desktop/Ubuntu/VM.dmg -c /Users/simonph/Desktop/Ubuntu/UbuntuServer/ubuntu-20.04.1-live-server-arm64.iso
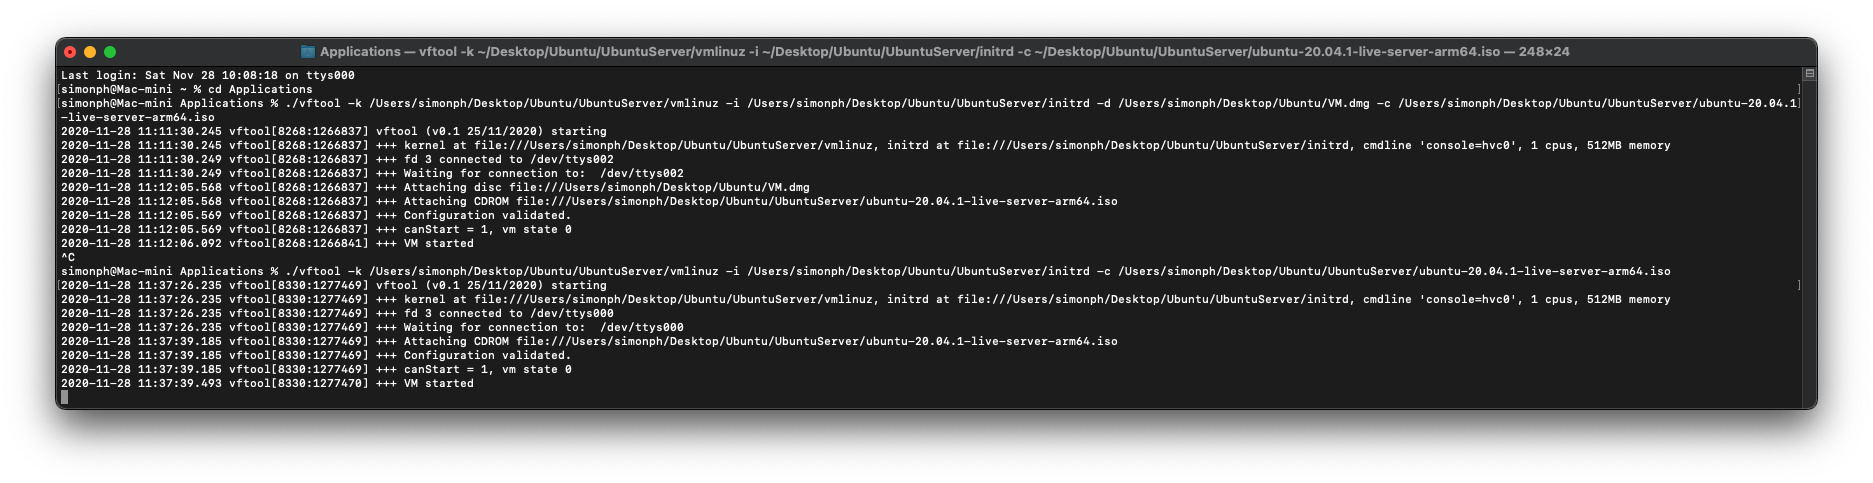
And here is the console
How did you obtain the kernel and initrd files ? I'm trying to find this since yesterday 😅
You can find vmlinuz and initrd inside the iso image. (I used Keka to mount it). For the vmlinuz, you have to copy it, then rename it as .gz and extract.
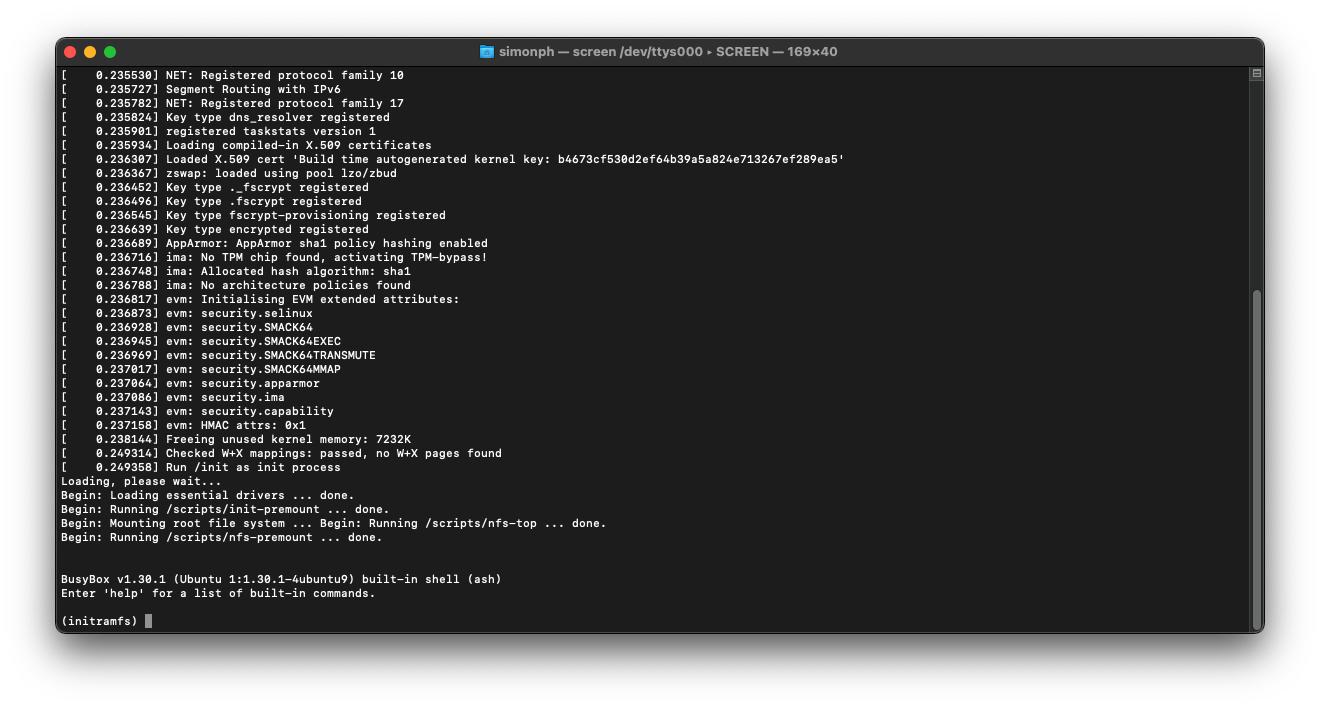
if you type exit at the prompt, it may give you some insight at what is going on.

try with -a "console=hvc0 root=/dev/vda1" I think it needs other arguments to work well because right now the text is all messed up. But thats progress

I got this after connect with screen /dev/ttys002 waiting message:
HOME/Library/Developer/Xcode/DerivedData/vftool-gifyyerhcgkkioeipwnxidpgzatn/Build/Products/Debug/vftool \
  -k $HOME/develop/UbuntuServer/vmlinuz \
  -i $HOME/develop/UbuntuServer/initrd \
  -d $HOME/VM/VM-Ubuntu.dmg \
  -c $HOME/develop/UbuntuServer/ubuntu-20.04.1-live-server-arm64.iso \
  -a "console=hvc0 root=/dev/vda1"
2020-11-29 16:51:40.132 vftool[18633:1749335] vftool (v0.1 25/11/2020) starting
2020-11-29 16:51:40.132 vftool[18633:1749335] +++ kernel at file:///Users/peter/develop/UbuntuServer/vmlinuz, initrd at file:///Users/peter/develop/UbuntuServer/initrd, cmdline 'console=hvc0 root=/dev/vda1', 1 cpus, 512MB memory
2020-11-29 16:51:40.132 vftool[18633:1749335] +++ fd 3 connected to /dev/ttys002
2020-11-29 16:51:40.132 vftool[18633:1749335] +++ Waiting for connection to:  /dev/ttys002
2020-11-29 16:54:06.674 vftool[18633:1749335] +++ Attaching disc file:///Users/peter/VM/VM-Ubuntu.dmg
2020-11-29 16:54:06.675 vftool[18633:1749335] --- Couldn't open disc at file:///Users/peter/VM/VM-Ubuntu.dmg
2020-11-29 16:54:06.675 vftool[18633:1749335] +++ Attaching CDROM file:///Users/peter/develop/UbuntuServer/ubuntu-20.04.1-live-server-arm64.iso
2020-11-29 16:54:06.675 vftool[18633:1749335] +++ Configuration validated.
2020-11-29 16:54:06.675 vftool[18633:1749335] +++ canStart = 1, vm state 0
2020-11-29 16:54:06.718 vftool[18633:1751389] --- VM start error: Error Domain=VZErrorDomain Code=1 "The virtual machine failed to start" UserInfo={NSDebugDescription=The virtual machine failed to start}
How I am create the disc /Users/peter/VM/VM-Ubuntu.dmg ?
Create an empty disc with the MacOS disk utility. The virtual machine failed to start!
Hi all (I'm late to the thread, real life intervened) :) I've just tried an ubuntu-server ISO again, and can re-create. Two things to note:
- The default RAM size (512MB) is too low for the ubuntu initrd -- passing
-m 2048solves the(initrd)prompt issue that @phsimons reported. - The ubuntu installer is unusable as @xiaolait and @sylvainfilteau note. (Even hitting ^T for simple mode, it's getting random keypress inputs.)
Notes on installers:
- Ubuntu-server boots, but the terminal is unusable.
- Debian install kernel/initrd on the debian-10.6.0-arm64-netinst.iso doesn't appear to have virtio drivers, so is a no-go. I installed Debian using
debootstrap(see below). - Fedora-33 boots, but then seems to crash (it immediately terminates/init halts the system).
- openSUSE-Tumbleweed-NET-aarch64-Current.iso (as of 28Nov20) installer boots nicely, is colourful and is usable, except has minor terminal issues: I keep having to hit tab/return to get the package download bargraphs to update.
However.... I don't believe running the installers is as easy as it sounds at this stage: once the packages are installed to your disc.img, then you'll need to fish out a kernel/initrd from the installed image, back to macOS, to boot it. (The initrd and likely the kernel will be different to those the installer uses.)
For this reason, enduring a chicken & egg situation and solving with another Linux box is IMO the easiest route currently. For example, installing Ubuntu or Debian using debootstrap, something like:
- Create a disc image, partitions, rootfs
- Mount root on say /mnt
-
debootstrap --arch=arm64 --foreign stable /mntas root While that's cooking, build a mainline arm64 kernel (which won't need an initrd to boot debian, at least). When debootstrap is finished, the kernel/disc.img can be booted in a VM, anddebootstrap --second-stageused to finish the installation (plus some manual stuff, like creating /etc/fstab, /etc/hosts, tzdata/locales). There are Debian/Ubuntu debootstrap directions on le net...
That doesn't help anyone that's desperate to use CentOS/Fedora etc. :) Anyone know if they have a debootstrap equivalent?
Finally: legend has it that there will be an EFI-related boot method in future, which may pave the way to booting ISOs (or even OVMF/edk2) directly, and that removes all of this faffing around with finding kernels/initrds. Hopefully a future macOS release will provide, here.
Create an empty disc with the MacOS disk utility. The virtual machine failed to start!
Oh dear -- I haven't seen this error before. The disc simply needs to be a file that exists and is of the size you want to use. For example, dd if=/dev/zero of=my_disc.img bs=1024k count=20480 makes a 20GB file of zeros.
But, see my previous message -- at this stage it is probably easiest to use Virtualization.framework/vftool with a disc image that is pre-installed elsewhere, unfortunately. Someone suitably motivated could perhaps write a script to extract kernels/initrds from a distribution install ISO, run the installer and then re-extract kernels/initrd from the installed disc, perhaps.
I'll see if I can recreate that error, though, how odd.
Thanks for the extended explanations ...
indeed Ubuntu-server boots, but the terminal is unusable.


But at this point isn't there a way to ssh in the VM and continue the install ?
I've had good luck with the Ubuntu cloud images linked by a kind user on the MacRumors forums [1]:
- kernel: https://cloud-images.ubuntu.com/releases/focal/release/unpacked/ubuntu-20.04-server-cloudimg-arm64-vmlinuz-generic
- initrd: https://cloud-images.ubuntu.com/releases/focal/release/unpacked/ubuntu-20.04-server-cloudimg-arm64-initrd-generic
- disk image: https://cloud-images.ubuntu.com/releases/focal/release/ubuntu-20.04-server-cloudimg-arm64.tar.gz
Let's assume you place all of these files in a linux directory under your home directory. Prepare the kernel:
mv ubuntu-20.04-server-cloudimg-arm64-vmlinuz-generic vmlinux.gz
gunzip vmlinux.gz
The initrd (just renaming for convenience):
mv ubuntu-20.04-server-cloudimg-arm64-initrd-generic initrd
And finally, the disk image:
tar xvfz ubuntu-20.04-server-cloudimg-arm64.tar.gz
mv focal-server-cloudimg-arm64.img disk.img
With these being cloud images, I want to disable cloud-init, set the root password, generate some SSH host keys, and configure DHCP. To work on the disk image, we'll boot the virtual machine without specifying the root to the Linux command line.
vftool -k vmlinux -i initrd -d disk.img -m 1024 -a "console=hvc0"
In another terminal, use screen to attach to the tty. The VM will finish booting and drop to an (initramfs) prompt. Then run:
mkdir /mnt
mount /dev/vda /mnt
chroot /mnt

touch /etc/cloud/cloud-init.disabled

echo 'root:root' | chpasswd

ssh-keygen -f /etc/ssh/ssh_host_rsa_key -N '' -t rsa
ssh-keygen -f /etc/ssh/ssh_host_dsa_key -N '' -t dsa
ssh-keygen -f /etc/ssh/ssh_host_ed25519_key -N '' -t ed25519

cat <<EOF > /etc/netplan/01-dhcp.yaml
network:
    renderer: networkd
    ethernets:
        enp0s1:
            dhcp4: true
    version: 2
EOF

exit
umount /dev/vda
Kill the VM with CTRL+C in the terminal you ran vftool and then run it again, but this time specifying the root to the kernel:
vftool -k vmlinux -i initrd -d disk.img -m 1024 -a "console=hvc0 root=/dev/vda"
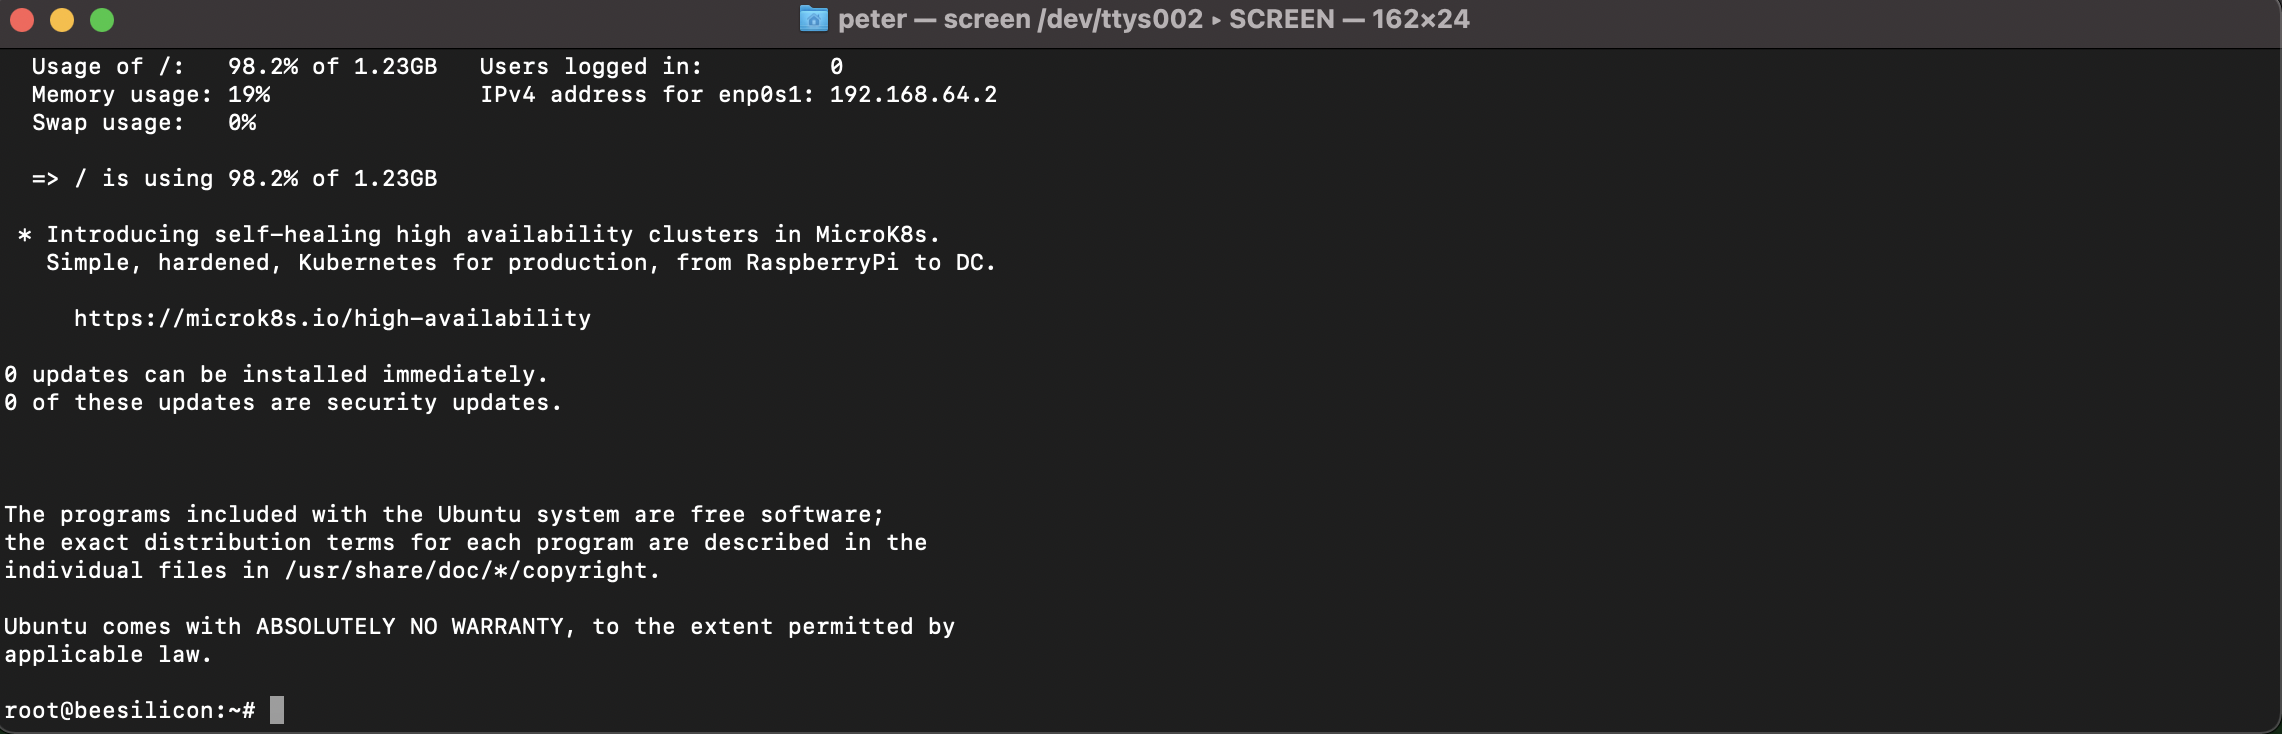
You can now connect with screen and login to the root user with root as the password. You can also ssh into the VM if you configure your public key. Show the IP address via ip addr show | grep "inet 192"


Got to install Ubuntu server on a disk image but not able to boot into it. Tried passing command line arguments to set root directory, doesn't seem to work. Got any idea? stuck on initramfs.
I use this to install the initramfs
mkdir /mnt
mount /dev/vda /mnt
chroot /mnt

touch /etc/cloud/cloud-init.disabled

echo 'root:root' | chpasswd

echo "m1silicon" >/etc/hostname
ssh-keygen -f /etc/ssh/ssh_host_rsa_key -N '' -t rsa
ssh-keygen -f /etc/ssh/ssh_host_dsa_key -N '' -t dsa
ssh-keygen -f /etc/ssh/ssh_host_ed25519_key -N '' -t ed25519

cat <<EOF > /etc/netplan/01-dhcp.yaml
network:
    renderer: networkd
    ethernets:
        enp0s1:
            dhcp4: true
    version: 2
EOF

exit
umount /dev/vda
CTRL-C inside the VM
Then boot with disk:
$ vftool -k vmlinux -i initrd -d ubuntu-20.04-disk.img -m 1024 -a "console=hvc0 root=/dev/vda"
How I can expand or add a filesystem?
apt-get update
# crash with no space at filesystem...
df
Filesystem     1K-blocks    Used Available Use% Mounted on
udev              460708       0    460708   0% /dev
tmpfs              98816   10608     88208  11% /run
/dev/vda         1286424 1270040         0 100% /
tmpfs             494076       0    494076   0% /dev/shm
tmpfs               5120       0      5120   0% /run/lock
tmpfs             494076       0    494076   0% /sys/fs/cgroup
/dev/loop0         50048   50048         0 100% /snap/core18/1936
/dev/loop1         27520   27520         0 100% /snap/snapd/9730
/dev/loop2         61312   61312         0 100% /snap/lxd/18152
tmpfs              98812       0     98812   0% /run/user/0
I did this with qemu-img installed using brew
To increase the disk by 50Gb
qemu-img resize disk.img +50G
Then, you will need to resize the fs
You install the emu with rosetta 2 intel brew?
I got the installation error at ny arm brew installation?
==> /opt/homebrew/Cellar/sphinx-doc/3.3.1_1/libexec/bin/pip install -v --no-deps --no-binary :all: --ignore-installed /private/tmp/sphinx-doc--MarkupSafe-20201201-12738-1vhhiv8
Last 15 lines from /Users/peter/Library/Logs/Homebrew/sphinx-doc/15.pip:
    requirement.install(
  File "/opt/homebrew/Cellar/sphinx-doc/3.3.1_1/libexec/lib/python3.9/site-packages/pip/_internal/req/req_install.py", line 856, in install
    six.reraise(*exc.parent)
  File "/opt/homebrew/Cellar/sphinx-doc/3.3.1_1/libexec/lib/python3.9/site-packages/pip/_vendor/six.py", line 703, in reraise
    raise value
  File "/opt/homebrew/Cellar/sphinx-doc/3.3.1_1/libexec/lib/python3.9/site-packages/pip/_internal/operations/install/legacy.py", line 74, in install
    runner(
  File "/opt/homebrew/Cellar/sphinx-doc/3.3.1_1/libexec/lib/python3.9/site-packages/pip/_internal/utils/subprocess.py", line 273, in runner
    call_subprocess(
  File "/opt/homebrew/Cellar/sphinx-doc/3.3.1_1/libexec/lib/python3.9/site-packages/pip/_internal/utils/subprocess.py", line 242, in call_subprocess
    raise InstallationError(exc_msg)
pip._internal.exceptions.InstallationError: Command errored out with exit status 1: /opt/homebrew/Cellar/sphinx-doc/3.3.1_1/libexec/bin/python -u -c 'import sys, setuptools, tokenize; sys.argv[0] = '"'"'/private/tmp/pip-req-build-ltp9y04v/setup.py'"'"'; __file__='"'"'/private/tmp/pip-req-build-ltp9y04v/setup.py'"'"';f=getattr(tokenize, '"'"'open'"'"', open)(__file__);code=f.read().replace('"'"'\r\n'"'"', '"'"'\n'"'"');f.close();exec(compile(code, __file__, '"'"'exec'"'"'))' install --record /private/tmp/pip-record-x3k5bx1n/install-record.txt --single-version-externally-managed --compile --install-headers /opt/homebrew/Cellar/sphinx-doc/3.3.1_1/libexec/include/site/python3.9/MarkupSafe Check the logs for full command output.
WARNING: You are using pip version 20.2.4; however, version 20.3 is available.
You should consider upgrading via the '/opt/homebrew/Cellar/sphinx-doc/3.3.1_1/libexec/bin/python -m pip install --upgrade pip' command.
Removed build tracker: '/private/tmp/pip-req-tracker-292f1dnh'

Do not report this issue to Homebrew/brew or Homebrew/core!


Error: You are running macOS on a arm64 CPU architecture.
We do not provide support for this (yet).
Reinstall Homebrew under Rosetta 2 until we support it.
You will encounter build failures with some formulae.
Please create pull requests instead of asking for help on Homebrew's GitHub,
Twitter or any other official channels. You are responsible for resolving
any issues you experience while you are running this
unsupported configuration.
I install qemu with rosetta 2.
I resize the image:'
$ qemu-img resize ubuntu-20.04-disk.img +50G
WARNING: Image format was not specified for 'ubuntu-20.04-disk.img' and probing guessed raw.
         Automatically detecting the format is dangerous for raw images, write operations on block 0 will be restricted.
         Specify the 'raw' format explicitly to remove the restrictions.
Image resized.
$ ls -l
total 45735352
drwxr-xr-x   8 peter  staff          256  1 Dez 06:38 .
drwxr-xr-x  12 peter  staff          384  1 Dez 05:06 ..
-rw-r--r--   1 peter  staff          170 24 Nov 00:41 README
-rw-r--r--   1 peter  staff     27702569 24 Nov 00:39 initrd
-rw-r--r--   1 peter  staff  55081697280  1 Dez 18:59 ubuntu-20.04-disk.img
-rw-r--r--   1 peter  staff    471734209 24 Nov 00:42 ubuntu-20.04-server-cloudimg-arm64.tar.gz
-rw-r--r--   1 peter  staff  21474836480  1 Dez 06:38 vm_disc.img
-rw-r--r--   1 peter  staff     30382464 24 Nov 00:39 vmlinux
But after start inside the ubuntu vm the resizing isn't available:
df
Filesystem     1K-blocks    Used Available Use% Mounted on
udev              975012       0    975012   0% /dev
tmpfs             201676     736    200940   1% /run
/dev/vda         1286424 1262040      8000 100% /
tmpfs            1008376       0   1008376   0% /dev/shm
tmpfs               5120       0      5120   0% /run/lock
tmpfs            1008376       0   1008376   0% /sys/fs/cgroup
/dev/loop0         27520   27520         0 100% /snap/snapd/9730
/dev/loop1         50048   50048         0 100% /snap/core18/1936
/dev/loop2         61312   61312         0 100% /snap/lxd/18152
tmpfs             201672       0    201672   0% /run/user/0
The disk info show that the image can grow...
qemu-img info ubuntu-20.04-disk.img
image: ubuntu-20.04-disk.img
file format: raw
virtual size: 51.3 GiB (55081697280 bytes)
disk size: 1.31 GiB
Were you able to boot into the disk? I always end up with the live version? If so, how did you manage to get it boot from the disk as the root! Any help is very much appreciated!
Now docker is running at the vm. Install the docker cli (Rosetta) and use an docker ssh context. Docker Engine is now directly available via at my Visual Studio Code.
Container Hacking is possible at the M1....
Can I help to document the setup?
Were you able to boot into the disk? I always end up with the live version? If so, how did you manage to get it boot from the disk as the root! Any help is very much appreciated!
It is a two phase boot process.
Frist boot with RAM disk and create the /dev/vda manually without login Second boot with disk (add the root=/dev/vda parameter), is a normal boot with login
Thanks a ton! But if I reboot won’t I lose the changes since we’re not writing the changes! Correct me if I’m wrong! Can you walk me through the process? That’d be of great help
a few days ago I created a turn-key ready bundle containing SimpleVM and Ubuntu. the image works with vftool, too: https://github.com/mibosshard/SimpleVM/releases/download/20201128/SimpleVM_Ubuntu.zip https://github.com/mibosshard/SimpleVM/releases
I also made a binary of vftool: https://github.com/mibosshard/vftool/releases/download/20201126/vftool.zip https://github.com/mibosshard/vftool/releases
fwiw, it's not necessary to install qemu (and homebrew on rosetta).
Just appending data on the cloud image is enough.
I used truncate -s 20G focal-server-cloudimg-arm64.img (truncate needs to be installed, for instance via macports), but a plain >> should be enough
Then:
root@ubuntu:~# resize2fs /dev/vda
resize2fs 1.45.5 (07-Jan-2020)
Filesystem at /dev/vda is mounted on /; on-line resizing required
old_desc_blocks = 1, new_desc_blocks = 3
The filesystem on /dev/vda is now 5242880 (4k) blocks long.

root@ubuntu:~# df -h
Filesystem      Size  Used Avail Use% Mounted on
udev            953M     0  953M   0% /dev
tmpfs           197M  740K  197M   1% /run
/dev/vda         20G  1.3G   19G   7% /
tmpfs           985M     0  985M   0% /dev/shm
tmpfs           5.0M     0  5.0M   0% /run/lock
tmpfs           985M     0  985M   0% /sys/fs/cgroup
/dev/loop0       27M   27M     0 100% /snap/snapd/10243
/dev/loop1       49M   49M     0 100% /snap/core18/1936
tmpfs           197M     0  197M   0% /run/user/0
/dev/loop2       60M   60M     0 100% /snap/lxd/18152