Update README JWT Setup instructions
I've had a lot of trouble setting up multisite-rest-api. I've never used JWT (neither knew of its existence to be honest). To make things worse, the documentation of the plugin that was recommended for JWT was not good (their authors even admitted they are working to improve it since now it is not very user friendly for new users).
Having said that. Here is wat worked for me: (probably will help the documentation development as well as remind me what I have done in the future) **This will be a list for JWT configuration for this plugin only
Step 1: Install Simple JWT as recomended ok easy enough. Unlike this plugin, just search for it in the plugin browser and activate. Then go to your main WP Multisite - Site and you'll find it at the bottom of the left sidebar.
Step 2: Configuration (this is the part not very clear)
- Go to General Tab.
- I changed the route Namespace to
jwt/. This is only for convenience only. This is the route you need to call when creating and validating the jwt token. I will explain later. - Leave most JWT signature settings except JWT Decryption Key. I'm not sure how this works really, but it should improve your Token's security. The content can be whatever.
- Make sure
#4 HeaderAt "Get JWT token Form" is set to "Authorization" and it is On. It should be the default but if you have an inconvenience it is a good thing to check for. - In my case, I checked the last
betaCheckbox Option: For what I understand, this feature lets the plugin grab all JWT Authentications or at least forces all external request to use JWT.
 - Save & Go to the login Tab. I set Auto-Login to Yes, but I don't really think this is necessary.
-
JWT Login Settings. This is The part I struggled with the most. This is where the means of authentication is selected. Multisite-Rest-Api uses verification by ID so if this is set to
Log in by Email(which I think is the default) IT WONT WORK. - At the parameter key, type "id"

- Save & Go to the Authentication Tab. Here you set how the JWT token is going to be generated. Simple enough, but there is no much guidance here on what to do.
- First set to
YesAllow Authentication - Check the id parameter at
JWT Payload parameters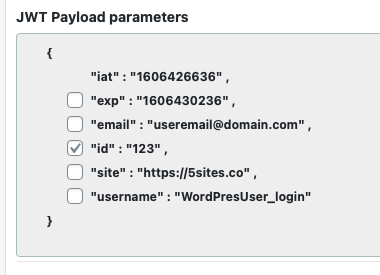
- Set The Token time to live according to your needs.
 My understanding is that the first parameter is the tokens TTL in a single session whereas the second parameter is the tokens itself TTL before you need to generate a new one.
 - Save
-
Generate & Validate the token. Use a tool of your liking to make a POST request to
[your_url]/wp-json/[jwt_namespace_route]/auth?username=[mu_super_Admin_user]&password=[admins_password]
For example
curl -X POST https://example.com/wp-json/jwt/auth?username=admin&password=password
You should get something like:
{
    "success": true,
    "data": {
        "jwt": "thisWillBeYourToken!" <- copy this!
    }
}
To validate make a GET request to this route:
[url]/wp-json/[namespace]/auth/validate&JWT=[your_JWT]
You should get something like:
{
    "success": true,
    "data": {
        "user": {
            "ID": "1",
            "user_login": "admin",
            "user_nicename": "admin",
            "user_email": "[email protected]",
            "user_url": "https://yourdomain.com",
            "user_registered": "2020-08-08 18:15:53",
            "user_activation_key": "",
            "user_status": "0",
            "display_name": "admin",
            "spam": "0",
            "deleted": "0"
        },
        "jwt": [
            {
                "token": "your_input_token",
                "header": {
                    "typ": "JWT",
                    "alg": "HS256"
                },
                "payload": { <- this is the content of the JWT. This is what was seated at step #11
                    "iat": 1111111111,
                    "id": 1, <- remember the checkbox? this should be the id number of your user admin
                }
            }
        ]
    }
}
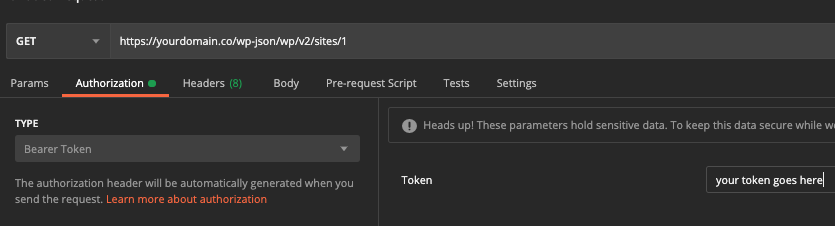
- You should have your JWT available for use with the multisite-rest-api.
Bonus: USE POSTMAN