Bad results of generating images of KITTI dataset
Hi @akshaychawla. Thanks for the code.
I tried to generate images of KITTI dataset with yolov3 model but got bad results. I used my own yolov3 pretrained model / cfg file and KITTI dataset. From the 'losses.log' file I found the parameter 'unweighted/loss_r_feature' was 1083850.375. After changing the parameter 'self.bn_reg_scale' to 0.00001, the results are also bad.
I am not sure if there is a problem with my use of the code and also confused about why the parameter 'unweighted/loss_r_feature' is so big. Could you give me some guidance?
Best, Xiu
1.Results of 2500 iteration:
2.losses.log of 1/2500 iteration: ITERATION: 1 weighted/total_loss 108692.2578125 weighted/task_loss 174.9200897216797 weighted/prior_loss_var_l1 117.44781494140625 weighted/prior_loss_var_l2 0.0 weighted/loss_r_feature 108385.0390625 weighted/loss_r_feature_first 14.853784561157227 unweighted/task_loss 349.8401794433594 unweighted/prior_loss_var_l1 1.5659708976745605 unweighted/prior_loss_var_l2 6894.822265625 unweighted/loss_r_feature 1083850.375 unweighted/loss_r_feature_first 7.426892280578613 unweighted/inputs_norm 12.4415922164917 learning_Rate 0.1999999210431752 ITERATION: 2500 weighted/total_loss 58120.15625 weighted/task_loss 101.14430236816406 weighted/prior_loss_var_l1 77.38021850585938 weighted/prior_loss_var_l2 0.0 weighted/loss_r_feature 57935.38671875 weighted/loss_r_feature_first 6.245403289794922 unweighted/task_loss 202.28860473632812 unweighted/prior_loss_var_l1 1.0317362546920776 unweighted/prior_loss_var_l2 4149.73193359375 unweighted/loss_r_feature 579353.875 unweighted/loss_r_feature_first 3.122701644897461 unweighted/inputs_norm 13.469326972961426 learning_Rate 0.0 Verifier InvImage mPrec: 0.005173 mRec: 0.001166 mAP: 0.0006404 mF1: 0.001902 Teacher InvImage mPrec: 0.005173 mRec: 0.001166 mAP: 0.0006404 mF1: 0.001902 Verifier GeneratedImage mPrec: 0.005173 mRec: 0.001166 mAP: 0.0006404 mF1: 0.001902
- r_feature of different bn layers tensor(7.42703, device='cuda:0', grad_fn=<AddBackward0>) tensor(12243.45508, device='cuda:0', grad_fn=<AddBackward0>) tensor(696.13055, device='cuda:0', grad_fn=<AddBackward0>) tensor(3364.34961, device='cuda:0', grad_fn=<AddBackward0>) tensor(23411.76953, device='cuda:0', grad_fn=<AddBackward0>) tensor(1157.99390, device='cuda:0', grad_fn=<AddBackward0>) tensor(10253.75781, device='cuda:0', grad_fn=<AddBackward0>) tensor(805.68719, device='cuda:0', grad_fn=<AddBackward0>) tensor(2327.99268, device='cuda:0', grad_fn=<AddBackward0>) tensor(28308.19727, device='cuda:0', grad_fn=<AddBackward0>) tensor(875.56348, device='cuda:0', grad_fn=<AddBackward0>) tensor(2283.58887, device='cuda:0', grad_fn=<AddBackward0>) tensor(986.32434, device='cuda:0', grad_fn=<AddBackward0>) tensor(16160.01953, device='cuda:0', grad_fn=<AddBackward0>) tensor(1146.45435, device='cuda:0', grad_fn=<AddBackward0>) tensor(2227.72607, device='cuda:0', grad_fn=<AddBackward0>) tensor(891.68048, device='cuda:0', grad_fn=<AddBackward0>) tensor(1558.72815, device='cuda:0', grad_fn=<AddBackward0>) tensor(976.82690, device='cuda:0', grad_fn=<AddBackward0>) tensor(1683.61230, device='cuda:0', grad_fn=<AddBackward0>) tensor(942.91931, device='cuda:0', grad_fn=<AddBackward0>) tensor(770.93372, device='cuda:0', grad_fn=<AddBackward0>) tensor(981.38751, device='cuda:0', grad_fn=<AddBackward0>) tensor(775.02832, device='cuda:0', grad_fn=<AddBackward0>) tensor(875.90454, device='cuda:0', grad_fn=<AddBackward0>) tensor(673.36096, device='cuda:0', grad_fn=<AddBackward0>) tensor(24172.25781, device='cuda:0', grad_fn=<AddBackward0>) tensor(773.39252, device='cuda:0', grad_fn=<AddBackward0>) tensor(23998.14844, device='cuda:0', grad_fn=<AddBackward0>) tensor(705.16992, device='cuda:0', grad_fn=<AddBackward0>) tensor(7424.77148, device='cuda:0', grad_fn=<AddBackward0>) tensor(928.11621, device='cuda:0', grad_fn=<AddBackward0>) tensor(3338.66113, device='cuda:0', grad_fn=<AddBackward0>) tensor(896.17908, device='cuda:0', grad_fn=<AddBackward0>) tensor(2490.50635, device='cuda:0', grad_fn=<AddBackward0>) tensor(788.92633, device='cuda:0', grad_fn=<AddBackward0>) tensor(2501.64746, device='cuda:0', grad_fn=<AddBackward0>) tensor(872.77161, device='cuda:0', grad_fn=<AddBackward0>) tensor(1576.98535, device='cuda:0', grad_fn=<AddBackward0>) tensor(738.18060, device='cuda:0', grad_fn=<AddBackward0>) tensor(1244.70312, device='cuda:0', grad_fn=<AddBackward0>) tensor(763.75208, device='cuda:0', grad_fn=<AddBackward0>) tensor(787.21594, device='cuda:0', grad_fn=<AddBackward0>) tensor(20193.73828, device='cuda:0', grad_fn=<AddBackward0>) tensor(1710.63989, device='cuda:0', grad_fn=<AddBackward0>) tensor(266827.34375, device='cuda:0', grad_fn=<AddBackward0>) tensor(2827.42188, device='cuda:0', grad_fn=<AddBackward0>) tensor(93085.09375, device='cuda:0', grad_fn=<AddBackward0>) tensor(3639.37866, device='cuda:0', grad_fn=<AddBackward0>) tensor(92241.87500, device='cuda:0', grad_fn=<AddBackward0>) tensor(4282.84180, device='cuda:0', grad_fn=<AddBackward0>) tensor(408516.68750, device='cuda:0', grad_fn=<AddBackward0>)
Hi @withbrightmoon , thank you for the interest in our work. I'll try my best to help you out.
It definitely looks like the deep feature statistics loss loss_r_feature is overshadowing all other losses in this optimization. I think the default values are not working for you because the Yolo-v3 KITTI model's deep features have values that are much higher than our Yolo-v3 model trained on COCO. However, I'm confident we can get some reasonable images from your model using the following process:
This is how we can go about debugging the image generation process:
- Set
--r-featureloss to0.0and--tv-l2=0.0. This should generate images with perfecttask_loss=0.0but the images themselves will be very noisy and look similar to adversarial examples. - Then we slowly turn up the
--tv-l1or--tv-l2so that we start seeing images which are more smooth (i.e less high frequency noise) and wherever there is an object in the ground truth, we should see some indication of the object. (e.g if there is a person predicted, we should see outline of a person). - Then we slowly turn up the
--r-feature, starting from a very small value1e-10all the way up to0.1and see at which point the images are looking reasonable.
Can you try step (1) post the results? My guess is that without --r-feature the task loss should go down to 0.0 pretty quickly. can you also post the parameters that you run with every run?
Hi @akshaychawla, thanks for your kind reply.
I have conducted some experiments, here are some preliminary experimental results. In order to simplify the problem, I only keep one bounding box label for each image. The batch size is set to 16.
- Exp1: only use detection loss:
(1) Parameters:
Namespace(alpha_img_stats=0.0, alpha_mean=1.0, alpha_ssim=0.0, alpha_var=1.0, arch_name='resnet50', beta1=0.0, beta2=0.0, box_sampler=False, box_sampler_conf=0.5, box_sampler_earlyexit=1000000, box_sampler_maxarea=1.0, box_sampler_minarea=0.0, box_sampler_overlap_iou=0.2, box_sampler_warmup=1000, bs=16, cache_batch_stats=False, cosine_layer_decay=False, display_every=100, do_flip=True, epochs=20000, first_bn_coef=0.0, fp16=False, init_bias=0.0, init_chkpt='', init_scale=1.0, iterations=2500, jitter=20, local_rank=0, lr=0.2, main_loss_multiplier=0.5, mean_var_clip=False, min_layers=1, min_lr=0.0, nms_conf_thres=0.05, nms_iou_thres=0.5, nms_params={'iou_thres': 0.5, 'conf_thres': 0.05}, no_cuda=False, num_layers=-1, p_norm=2, path='./diode_results//day_12_20_2021_time_16_09_20_res160', r_feature=0.0, rand_brightness=True, rand_contrast=True, random_erase=True, real_mixin_alpha=0.0, resolution=(160, 160), save_coco=True, save_every=100, seeds='0,0,23456', shuffle=False, train_txt_path='/home/lxs/datasets/KITTI/train.txt', tv_l1=0.0, tv_l2=0.0, wd=0.0)
(2) Loss:
Iteration: 100
[WEIGHTED] total loss 40.087703704833984
[WEIGHTED] task_loss 40.087703704833984
[WEIGHTED] prior_loss_var_l1: 0.0
[WEIGHTED] prior_loss_var_l2: 0.0
[WEIGHTED] loss_r_feature 0.0
[WEIGHTED] loss_r_feature_first 0.0
[UNWEIGHTED] inputs_norm 41.83795166015625
[UNWEIGHTED] mAP VERIFIER 0.0
[UNWEIGHTED] mAP TEACHER 0.0
Saving batch_tensor of shape torch.Size([16, 3, 160, 160]) to location: ./diode_results//day_12_20_2021_time_16_09_20_res160/iteration_targets_100.jpg
Iteration: 2500
[WEIGHTED] total loss 3.5411276817321777
[WEIGHTED] task_loss 3.5411276817321777
[WEIGHTED] prior_loss_var_l1: 0.0
[WEIGHTED] prior_loss_var_l2: 0.0
[WEIGHTED] loss_r_feature 0.0
[WEIGHTED] loss_r_feature_first 0.0
[UNWEIGHTED] inputs_norm 40.25554656982422
[UNWEIGHTED] mAP VERIFIER 0.5408
[UNWEIGHTED] mAP TEACHER 0.5408
Saving batch_tensor of shape torch.Size([16, 3, 160, 160]) to location: ./diode_results//day_12_20_2021_time_16_09_20_res160/iteration_targets_2500.jpg
(3) real_image_targets:
 (4) iteration_targets_2500:

- Exp2: detection loss + tv_l1 loss:
(1) Parameters:
Namespace(alpha_img_stats=0.0, alpha_mean=1.0, alpha_ssim=0.0, alpha_var=1.0, arch_name='resnet50', beta1=0.0, beta2=0.0, box_sampler=False, box_sampler_conf=0.5, box_sampler_earlyexit=1000000, box_sampler_maxarea=1.0, box_sampler_minarea=0.0, box_sampler_overlap_iou=0.2, box_sampler_warmup=1000, bs=16, cache_batch_stats=False, cosine_layer_decay=False, display_every=100, do_flip=True, epochs=20000, first_bn_coef=0.0, fp16=False, init_bias=0.0, init_chkpt='', init_scale=1.0, iterations=2500, jitter=20, local_rank=0, lr=0.2, main_loss_multiplier=0.5, mean_var_clip=False, min_layers=1, min_lr=0.0, nms_conf_thres=0.05, nms_iou_thres=0.5, nms_params={'iou_thres': 0.5, 'conf_thres': 0.05}, no_cuda=False, num_layers=-1, p_norm=2, path='./diode_results//day_12_20_2021_time_17_26_16_res160', r_feature=0.0, rand_brightness=True, rand_contrast=True, random_erase=True, real_mixin_alpha=0.0, resolution=(160, 160), save_coco=True, save_every=100, seeds='0,0,23456', shuffle=False, train_txt_path='/home/lxs/datasets/KITTI/train.txt', tv_l1=75.0, tv_l2=0.0, wd=0.0)
(2) Loss:
Iteration: 100
[WEIGHTED] total loss 122.3427734375
[WEIGHTED] task_loss 40.76097869873047
[WEIGHTED] prior_loss_var_l1: 81.58179473876953
[WEIGHTED] prior_loss_var_l2: 0.0
[WEIGHTED] loss_r_feature 0.0
[WEIGHTED] loss_r_feature_first 0.0
[UNWEIGHTED] inputs_norm 38.48661804199219
[UNWEIGHTED] mAP VERIFIER 0.0
[UNWEIGHTED] mAP TEACHER 0.0
Saving batch_tensor of shape torch.Size([16, 3, 160, 160]) to location: ./diode_results//day_12_20_2021_time_17_26_16_res160/iteration_targets_100.jpg
Iteration: 2500
[WEIGHTED] total loss 6.840198516845703
[WEIGHTED] task_loss 3.585224151611328
[WEIGHTED] prior_loss_var_l1: 3.254974603652954
[WEIGHTED] prior_loss_var_l2: 0.0
[WEIGHTED] loss_r_feature 0.0
[WEIGHTED] loss_r_feature_first 0.0
[UNWEIGHTED] inputs_norm 19.671659469604492
[UNWEIGHTED] mAP VERIFIER 0.4228
[UNWEIGHTED] mAP TEACHER 0.4228
Saving batch_tensor of shape torch.Size([16, 3, 160, 160]) to location: ./diode_results//day_12_20_2021_time_17_26_16_res160/iteration_targets_2500.jpg
(3) real_image_targets:
 (4) iteration_targets_2500:

- Analysis:
(1) It seems that in the generated images, some objects in the bounding box look like car or people. However the problem is that the generated image does not have the appearance information of the natural image, and it is a bit like feature map of higher layers.
(2) I tried the segmentation model DeepLabv2 with ResNet101 and GTA5 dataset before, and when I used deepInversion to generate images, I also got similar results. There are the results of two experiments:

 (3) I will test more parameters and add a discriminator to determine whether it is a natural image to see the result. If there are further results, I will provide them.
Thank you for your detailed reply and attention!
Best, Xiu
Thanks for running these experiments Xiu. We can atleast see that the images are being optimized w.r.t the losses that are enabled. The dark images in experiment 2 show that total variation loss is working.
- Can you try running with slightly lower
tv_l1, I think 75 is a bit too high for this problem. Maybe try 10 or 25. - Can you also try using
tv_l2instead oftv_l1? Try withtv_l2 = 0.0001 to 0.01in log scale - One of the things that we used to improve image quality was in-batch data augmentation, this was very useful for our experiments but may be causing problems in your mix of dataset + model. You can turn off these data augmentations methods by omitting the flags
--do-flip, --rand-brightness, --rand-contrast and --random-erase. You can later turn them on to improve performance. These flags are defined here: https://github.com/NVlabs/DIODE/blob/80a396d5772528d4c393a301b0a1390eb7e7e039/main_yolo.py#L234 - One issue with your choice of targets (bboxes) is that they are very very small. Can you instead randomly initialize one large box per image? e.g a large bounding box in the center of the image. Then it will be easier to see object specific features.
- I think it may be time to start slowly adding
--r-featureto improve image quality after you have tried the previous suggestions. Try initially with a very small value--r-feature=0.0000001and start increasing it up to--r-feature=0.001in log scale and see at what point the images start to look somewhat realistic. Make sure that the weighted loss_r_feature is about the or slightly lesser in order of magnitude compared to the task loss. If this loss is too large, you will mostly see noise because the task loss will barely be optimized. and also make sure that you are using the 2nd order norm by passing--p-norm=2
Once you can confirm that you can see some good features, then it makes sense to turn on data augmentation methods to improve performance. Looking forward to your results!
Sorry for the late reply. I was busy with another project about action recognition this week and did not find time to do experiments. Next week, I will carry out some experiments in accordance with your instructions and report the results. Thank you very much for your detailed reply.
Happy New Year!
Best, Xiu
Hi @akshaychawla , thanks for your kind guidance, sorry for the late reply.
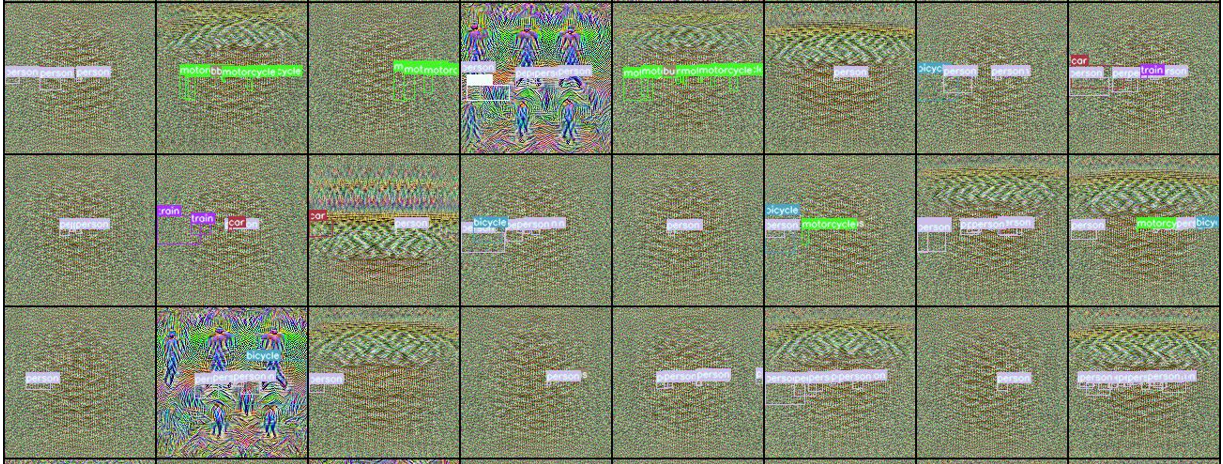
I did some experiments in accordance with your instructions, and got better results. The following is the record of some experiments. For simplicity, the bounding box is set to 80*80 in the center.
- Exp1:
tv_l1&&tv_l2(withno data augmentation,--r-feature=0.0)
-
tv_l1=10
-
tv_l1=25
-
tv_l2=0.0001
-
tv_l2=0.001
-
tv_l2=0.01
-
It seems that the results are better when
tv_l1=10,tv_l1=25, ortv_l2=0.01. In subsequent experiments, we settv_l1=10.
- Exp2: data augmentation (with
tv_l1=10,tv_l2=0.0,--r-feature=0.0)
-
no data augmetation
-
--do_flip
-
--rand_brightness
-
--rand_contrast
-
--random_erase
-
--do_flip --rand_brightness --rand_contrast --random_erase
-
From the results, it is difficult to see which data augmentation method is better. we choose two settings in subsequent experiments:
no data augmetationandall data augmentation methods.
- Exp3:
--r-feature&&--first_bn_coef(withtv_l1=10,tv_l2=0.0,no data augmetation)
-
--r-feature=1e-07&&--first_bn_coef=0.0
-
--r-feature=1e-06&&--first_bn_coef=0.0
-
--r-feature=1e-05&&--first_bn_coef=0.0
-
--r-feature=1e-05&&--first_bn_coef=2.0
-
--r-feature=5e-05&&--first_bn_coef=0.0
-
--r-feature=5e-05&&--first_bn_coef=2.0
-
--r-feature=1e-04&&--first_bn_coef=0.0
-
--r-feature=1e-04&&--first_bn_coef=2.0
-
--r-feature=1e-03&&--first_bn_coef=0.0
-
It seems that the results are better when
--r-feature=1e-05,--r-feature=5e-05, or--r-feature=1e-04.
- Exp4:parameter combination experiments
-
tv_l1=10&&--r-feature=5e-05 --first_bn_coef=2.0&&--do_flip --rand_brightness --rand_contrast --random_erase
-
tv_l1=10&&--r-feature=1e-04 --first_bn_coef=2.0&&--do_flip --rand_brightness --rand_contrast --random_erase
- Using a combination of these parameters seems to get better results.
- Exp5:further experiments
- changing the size of bounding box
(1)
tv_l1=10&&--r-feature=5e-05 --first_bn_coef=2.0&&--do_flip --rand_brightness --rand_contrast --random_erase (2)
(2) tv_l1=10&&--r-feature=1e-04 --first_bn_coef=2.0&&--do_flip --rand_brightness --rand_contrast --random_erase (3)
(3) tv_l1=10&&--r-feature=1e-05 --first_bn_coef=2.0&&--do_flip --rand_brightness --rand_contrast --random_erase
- changing the classes:
Based on the proportion of the number of samples of each class, there are 6 car / 4 pedestrian / 1 van / 1 truck / 1 person_sitting / 1 cyclist / 1 tram / 1 misc in 16 batch.
(1)
tv_l1=10&&--r-feature=1e-05 --first_bn_coef=2.0&&--do_flip --rand_brightness --rand_contrast --random_erase) (2)
(2) tv_l1=10&&--r-feature=5e-05 --first_bn_coef=2.0&&--do_flip --rand_brightness --rand_contrast --random_erase) (3)
(3) tv_l1=10&&--r-feature=1e-04 --first_bn_coef=2.0&&--do_flip --rand_brightness --rand_contrast --random_erase)
- After changing the size of bounding box or the classes, the generation result is somewhat worse. The target loss is also difficult to reduce to a low level (from around 100 to 10).
- Conclusion
- After following your instructions and conducting some experiments, we got better results than before.
- Next goals are : (1)generating more diverse objects; (2)generating object that looks more like a natural image; (3)generating multiple objects in one image. Please let me know if you have more suggestions.
Thanks again for your help!
Best, Xiu
Hi @withbrightmoon , Thank you for running these experiments, the results look objectively better than before. I apologize for not responding earlier. Here are a few more things that you can try to improve the quality of images:
- Currently image total variation is being reduced by
tv_l1=10, I would suggest addingtv_l2loss as well because it should further reduce the amount of pixel wise difference and lead to smoother images. - Weight decay is currently set to 0.0, it might be useful to try increasing that in log increments,
wd=1e-06, 1e-05, 1e-04to see if that helps push the image closer to 0.0. This might lead to a darker image but most street images are underexposed anyways so it should be fine. - Currently
beta1, beta2is set to0.0.which might be a problem because this means that the Adam optimizer is behaving mostly as a SGD optimizer. It might be useful to set these to the default values set in the pytorch documentation https://pytorch.org/docs/stable/generated/torch.optim.Adam.html
I’m trying to remember a few ideas to improve image diversity and will update with more ideas.
it happened in ours experiments too, my arch is retinanet, the generate image close to noise
@withbrightmoon Hi, I am really interested in this work based on the KITTI dataset. Could you share your code with me? My email address is [email protected]. Looking forward to your reply. Thanks a lot!