increase the accuracy and the stability of the rectangle detection ?
Hi, first of all thank you for this great library ! :-)
I try to use it in my application, principally for "scanning" documents.
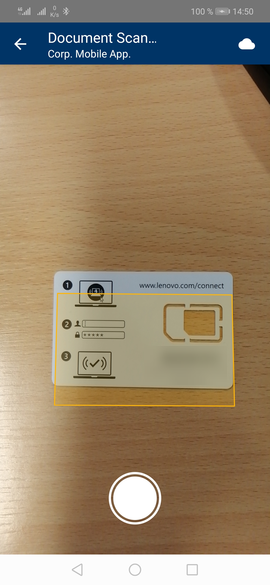
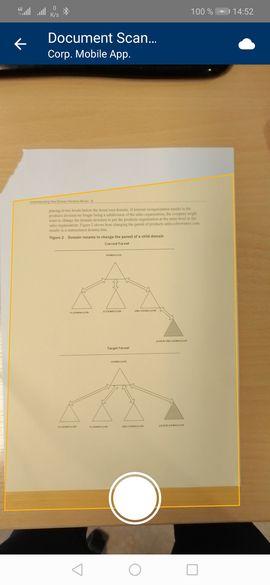
Is there a way to increase the accuracy and the stability of the rectangle detection ? You see in the screenshots below that it doesn't respect the corners.
Thanks.
I appreciate you using it! To address your points:
-
For the corners to line up the
<Scanner />node needs to be lined up with the<RectangleOverlay />component. The easiest way is to wrap them in a<View style={{position: 'relative'>and absolutely position them exactly over each other (so top: 0 for both). This can be a bit difficult because the navigation header can get in the way. I've had the best success using full screen. Also make sure to wrap the scanner and rectangle overlay in a view that can have its height and width adjusted because with Android, it has a list of supported preview screen sizes (the video preview) that may not be the same size as the view you are showing, so this can skew the preview image. If this doesn't work, let me know and I can make an experimental app with a nav bar and get it to line up. I've experienced a bit of issues with this myself sometimes so this is something I'll be trying to either get better documentation for or try to improve any way I can. -
Stability.... So I'd love to figure out how to stabilize this better. So far all it does is uses the same algorithm to detect the most prominent 4 coordinates on the screen. My thoughts on enhancing this would be to use shape constraints (so if a point is way off and the result wouldn't be a rectangle, then ignore it), and some sort of look back functionality. Basically take the outermost rectangle, then only try to detect rectangles close to that rectangle (like it's honing in on the final rectangle). And lastly, I'd like some sort of ability to detect the lighting of the preview so that the contrast can be adjusted to better bring out the shapes in the image. I have to balance this between quality and performance as well though.
So those ideas are my primary agenda for this package going forward. I don't have a timeline on any of these. My initial goal was to build something that worked well, was really configurable, and modular so I could upgrade small parts of it over time.
@humphreyja Thanks for your reply.
This is the code I use for rendering the scanner (almost the same than the example you provided) :
renderCamera() {
    const cameraIsDisabled = this.state.takingPicture || this.state.processingImage;
    const disabledStyle = {opacity: cameraIsDisabled ? 0.8 : 1};
    const previewSize = this.getPreviewSize();

    let rectangleOverlay = null;
    if (!this.state.loadingCamera && !this.state.processingImage) {
      rectangleOverlay = (
        <RectangleOverlay
          detectedRectangle={this.state.detectedRectangle}
          previewRatio={previewSize}
          // previewRatio={rectPreviewSize}
          backgroundColor="rgba(255,181,6, 0.2)"
          borderColor="rgb(255,181,6)"
          borderWidth={4}
          // == These let you auto capture and change the overlay style on detection ==
          // detectedBackgroundColor="rgba(255,181,6, 0.3)"
          // detectedBorderWidth={6}
          // detectedBorderColor="rgb(255,218,124)"
          // onDetectedCapture={this.capture}
          // allowDetection
        />
      );
    }

    return (
      <View
        style={{
          backgroundColor: 'rgba(0, 0, 0, 0)',
          position: 'relative',
          marginTop: previewSize.marginTop,
          marginLeft: previewSize.marginLeft,
          height: `${previewSize.height * 100}%`,
          width: `${previewSize.width * 100}%`,
        }}>
        <Scanner
          onPictureTaken={this.onPictureTaken}
          onPictureProcessed={this.onPictureProcessed}
          // enableTorch={this.state.flashEnabled}
          ref={this.camera}
          filterId={4}
          capturedQuality={0.8}
          onRectangleDetected={({detectedRectangle}) => this.setState({detectedRectangle})}
          onDeviceSetup={this.onDeviceSetup}
          // onTorchChanged={({enabled}) => this.setState({flashEnabled: enabled})}
          style={styles.scanner}
        />
        {rectangleOverlay}
        <SafeAreaView style={[styles.overlay]}>
          <View style={styles.buttonBottomContainer}>
            <View style={[styles.cameraOutline, disabledStyle]}>
              <TouchableOpacity activeOpacity={0.8} style={styles.cameraButton} onPress={this.capture} />
            </View>
          </View>
        </SafeAreaView>
        {this.renderCameraState()}
      </View>
    );
  }
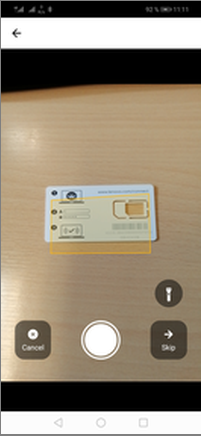
and when I use entirely the example you provided, the same behavior happen :
the solution I've found for my case is to change the position of the view in the RectangleOverlay.js (top: -30 rather than top: 0)
    return (
      <View style={{ position: 'absolute', top: -30, bottom: 0, right: 0, left: 0, backgroundColor: 'rgba(0,0,0,0)' }}>
        <Svg height={deviceWindow.height * previewRatio.height} width={deviceWindow.width * previewRatio.width} viewBox={`0 0 ${dimensions.width} ${dimensions.height}`}>
          <Path
            d={d}
            style={{ fill, stroke, strokeWidth, strokeLinejoin: 'round', strokeLinecap: 'round' }}
          />
        </Svg>
      </View>
    );
and the result is good
but I imagine it's not a good solution...
what do you think about it ?
@GaetanB999 Hmm ok I suspect that the <Scanner /> component is positioned to the actual full screen (meaning the view size + header size) while the <RectangleOverlay /> component is respecting the bounds set by react native. So the top -30 is due to the header size difference plus maybe a slight skew of the overlay size vs the preview size.
I've experienced this (currently my company's android app suffers from the same problem) which is why I remove the header from the camera view in my app. Using your top adjustment (only on android) or removing the header is what I would say is the current work around for now.
If you use react-navigation, you could set thee header style to headerTransparent=true and set the header background color. That way the screen contents will take up the full screen and you can still have your header.
Not a perfect solution I know. I'll be actively looking into figuring out a better solution for this though. In my latest release I fixed an issue where the preview and captured sizes were different on android and I suspect that something similar could be used to fix this as well (cropping the output preview before rectangle detection.)
First of all thank you for the hard work and time in to making this document scanner.
I have the same issue, I used the example you provided but sadly the screen does not detect the borders and corners good enough. I use google pixel 2 1080 resolution emulator.
Hi all,
Firstly, hat off for @humphreyja for making this package available, great work! Now to the issue at hand. After some debugging, I found out (at least on my iPhone 12 with iOS 15), that the properties passed to onDeviceSetup for previewHeightPercent and previewWidthPercent are always 1 even if the preview size is not 100% of the screen. Then looking at the JS code seems that those values are passed by the native module (at least for iOS). So, the following modifications solved the issue for me:
- Pack the Scanner component in its own View (put nothing else in that view).
- Use the
onLayoutproperty of the view to get it's dimensions set by the styles property (in my case width: 100%, height: 80%):
<View style={.....} onLayout={(event) => {
        const { width, height } = event.nativeEvent.layout;
        setPreviewHeight(height);
        setPreviewWidth(width);
      }}>
- Modify the
getPreviewSizemethod to calculate the % of the window, taken by the scanner view
const getPreviewSize = () => {
const dimensions = Dimensions.get('window');
const previewHeightPercent = previewHeight / dimensions.height;
const previewWidthPercent = previewWidth / dimensions.width;

// We use set margin amounts because for some reasons the percentage values don't align the camera preview in the center correctly.
const heightMargin = (1 - previewHeightPercent) * dimensions.height / 2;
const widthMargin = (1 - previewWidthPercent) * dimensions.width / 2;
if (dimensions.height > dimensions.width) {
  // Portrait
  return {
    height: previewHeightPercent,
    width: previewWidthPercent,
    marginTop: heightMargin,
    marginLeft: widthMargin,
    };
  }

  // Landscape
  return {
    width: previewHeightPercent,
    height: previewWidthPercent,
    marginTop: widthMargin,
    marginLeft: heightMargin,
  };
};
Now the positioning of the rectangle should be accurate, even if the scanner does not take the entire width and height of the view.
@peterkostadinov your suggestions were just what I was looking for! thank you!